Showing posts with label Blanket. Show all posts

Monday

My Favorite Free Knit and Crochet Patterns for Blankets


free crochet baby blanket pattern, striped, bobbles

Blackberry Stripe Baby Blanket is worked using 7 colors of Lion Brand Cotton-Ease (1449 total yards). It's based on an easy to learn Bobble Stitch, and links to a how-to video if the stitch is new to you. For the blanket pictured she used 7 different colors of yarn and randomly grabbed a different skein for each row.


Great blanket made up of 24 squares using self-striping sock yarn. Calls for 750 grams of yarn & US 4 needle for a gauge of 23 sts x 46 rows in garter st = 10 x 10 cm / 4'' x 4''. Click on the picture to go to the pattern.

013
Happy Colors Blanket is crocheted following a free tutorial on the Just-do blog.


A cheerful crocheted blanket, Orange Blossom  mixes stripes and flowers in warm summer colors using an H hook and a gauge of 14 dc x 8 rows = 10 x 10 cm / 4'' x 4''.


One of my all time favorite designers, Kaffe Fassett, has posted free instructions to make this patchwork knit
blanket, the Jubilee Throw, using Rowan Felted Tweed DK. It's a very extensive free pattern, written in several languages. But when you scroll to the end it has charts for each of the squares, any one of which could make an interesting cushion or bag. 

"An African Adventure", created by Horst Schulz. It'a on Ravelry so there are lots of different versions for inspiration.

Wednesday

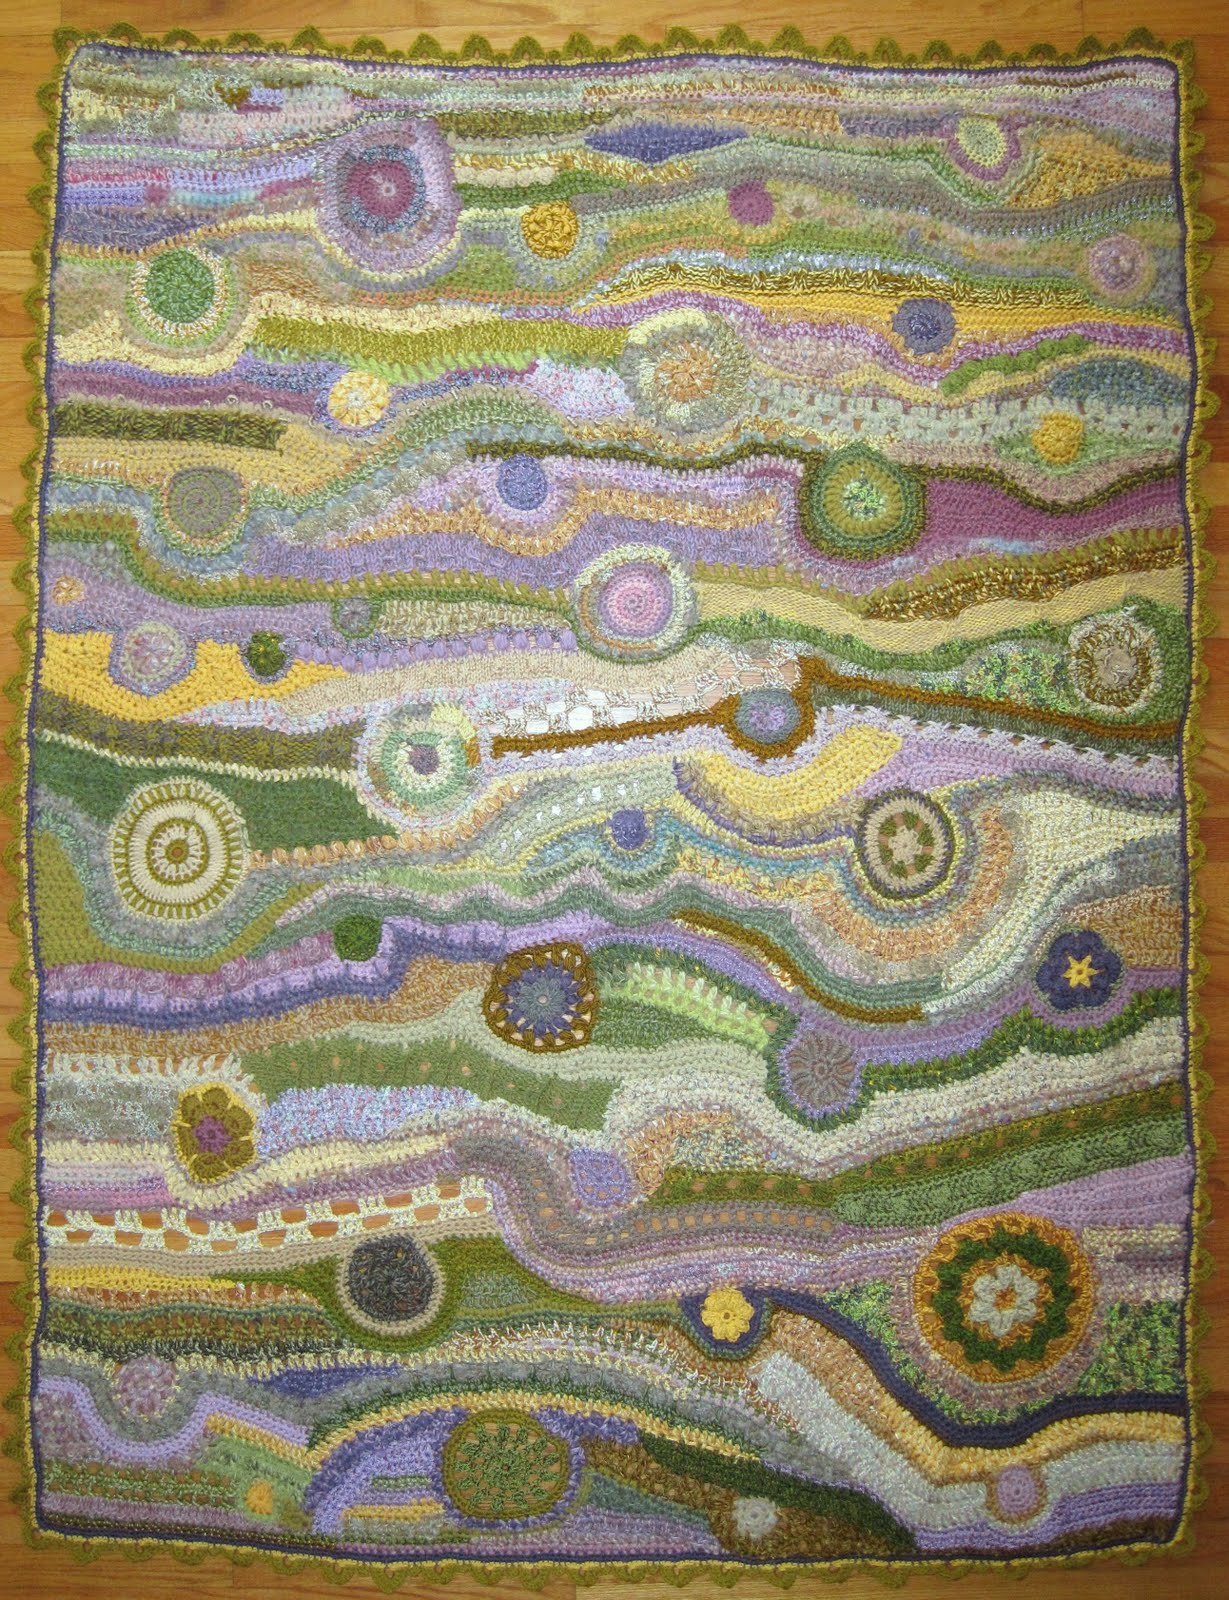
Freeform Afghan - Second Version

Finished! My second attempt at a Freeform Blanket


10/18/10: 
I’m starting a new blanket - trying to do a bit more “controlled” freeform than I have in the past. I’m wanting something that’s a bit calmer and more serene - not quite as tumultuous and busy as the last one. I’m wanting something linear that flows around circular shapes. Usually I cut a piece of fabric in the general shape that I want the piece to end up. This time I made a paper template (I've compiled a list of standard or average blanket and afghan sizes here) so I can draw in where I want the circles and can look at the big picture as I go instead of just randomly putting together shapes that have just sprung forth. (Which I love to do - just wanting to do something different this time.) I guess it could more rightly be called directed freeform.

My color choice is driven by an old Kaffe Fassett pattern featuring multi-yarn triangle shapes that I started about 5 years ago and never finished. I unraveled it, which made some interesting “Magic Balls” that got me started. I made up a bunch of different circle motifs, using patterns from “Beyond the Square, Crochet Motifs” by Edie Eckman. This is without question the book I use more than any other in my library when looking for interesting patterns in inspiring colors with easy to read written instructions and charts. 


Working about 10" ahead at a time I laid out the circles and then crocheted and knitted in stripes across. I drew lines every 10" just to have reference points.
Working towards the first 10" line


I joined my husband at a work conference on the Chesapeake. While he spent his days in meetings I wandered through the nearby towns and as always seems to happen came across some yarn stores. I bought a few yarns that seemed like they'd be perfect.
Yarns from Fibre Cafe in Cambridge, Maryland


Yarns from Yarns & Company in Easton, Maryland


I bought some really beautiful yarns, but some of the colors were really, really off. I cut some pieces of ribbon and attached the yarns onto them by color. I kept these in my handbag & pulled them out whenever a yarn store appeared in my path. It's a great system that's easy to maintain.


10/25/10:
I’ve been struggling to keep this going - not happy with the way it was heading and having trouble figuring out what to do next. On a meander through Ravelry I came across Melisseio’s Free Range Wrap which got me thinking about how I was approaching the whole thing. Between that and a couple of very encouraging Ravelry messages from Jenny Dowde (JenOz on Ravelry) and looking a bit at her work I’m back into a happy mind about where it’s heading. It’s a very different process than I usually use while “freeforming” in that I’ve got a much more specific idea of where I want to end up and how I want the piece to appear. I’m also using colors that are quite out of my usual sphere. Jenny's book, Freeform Knitting and Crochet  is one I often turn to when needing inspriation or a bit of technical direction.


11/8/10


It’s going much more quickly now. Am keeping up with my 10” per week goal - mostly because I’m already planning the next 3 or 4 projects & can’t wait to get this one finished & get onto those. 


almost finished - just need an edging


11/20/10:


The basic shape is finished. It’s feeling like it needs a border. Something sort of wavy so the uneven edges aren’t so noticeable.


12/3/10:


Finished! I decided I needed a border to finish it off. Used #54 from “Around the Corner, Crochet Borders” by Edie Eckman. I modified it slightly - I did 2 base rounds in purple, then did round 1 in yellow and round 2 in green.

This is the other Edie Eckman book that I use constantly. It's got great pictures, and it's easy to modify the instructions to fit the specific edging that you're trying to achieve. 

detail of edging

My "Inspired by Edie Eckman's Beyond The Square" Afghan

I used Edie Eckman's book, "Beyond the Square" crochet motif guidebook to make circles for my freeform afghan and enjoyed the square making process so much I've decided to make one of each of the motifs in the book and somehow put it together into an afghan.


Monday

How to Figure How Many Granny Squares You Need For an Afghan

There are a number of things you need to keep in mind when figuring how many squares you'll need to make an afghan or blanket.


1. Make several squares in the pattern you've chosen.

2. Block and measure the squares. Blocking is especially important when assembling a blanket out of squares. It's one of the few times I actually block my work. The time and headache saved in assembly more than makes up for what you spend blocking. I have photos and written instructions on the process I follow here.

3. Decide how you're going to assemble your squares. The assembly method you choose will affect the finished size of your blanket. Whipstitching or single crocheting the blocks together won't afect the size much. But joining with a decorative stitch can affect the outcome. Even just a 1/4" added on a join can add 4 - 5" to the overall size of a king blanket using 4" squares. So if you're choosing something fancy like that you're going to have to piece a few together to figure out what the size is of your blocked, assembled square.

4. Divide the length and width of the blanket you want  (I've compiled a list of standard blanket & bedding sizes here) to make by the size of your finished squares (including whatever you added for assembly).
This probably won't be a round number, so you'll have to decide whether you want to round up and make a slightly larger blanket, or round down and make a slightly smaller blanket. (Keep in mind that if you round down you can add a decorative border.) Then multiply the number of squares you need across by the number of squares you need for the length and you'll have the total number of squares you'll need to make.

As a formula it would look like this for a 48" x 60" throw made out of 5" squares:
48"/5"=9.6" so round up to 10.
60/5=12.
10 x 12=120.
So you'd end up making 120 squares and your blanket would be done in rows of 10 squares. And you'd have 12 rows.
Final finished size would be 50" x 50".

My 3 favorite books filled with Granny Square Patterns:

I've spent a lot of time poking around the web looking for free granny square patterns. Keeping track of them is sort of a nightmare. Not only are the patterns written in each persons own "shorthand", but the photos are uneven & it's a hassle to print them out & keep them in any sort of organized fashion that allows me to find what I want when I want it. While browsing in the bookstore I bought just about every book I could find on the subject. Here are my favorites. I highly recommend them to your library!


Thursday

Upcycled Blanket

I've been wanting a nice heavy-weight wool blanket and haven't been able to find one to buy. I thought about knitting & felting one, but only had to look at the long-unfinished Babette sitting in a sorry pile in the corner to realize that wasn't happening in this lifetime. About this time one of my daughter's friends returned a lovely striped sweater she'd borrowed & kindly machine washed & dried before returning. Not knowing any 6-month olds in need of a heavily felted sweater I tossed it on my worktable hoping for an inspirational idea to appear. I got the idea to turn it into a patchwork sweater & got to work scouring the house for outgrown or holey sweaters. I got all those felted & realized that I'd be needing a whole lot of sweaters. I hit the local thrift shops. But this being SoCal, wool sweaters were hard to come by. I turned to ebay next, and had great luck - never spending more than about $6 (with freight) for a sweater. I played around a while and came up with a wide zigzag stitch on my sewing machine that allowed me to butt two pieces together. That way the blanket would be double sided with no thick seams. I've been using it for a few months now and it's exactly what I wanted - thick, heavy & very warm.

I've compiled a list of average blanket sizes to use in designing your afghans and blankets.

Babette Blanket: Day 3

It's going much faster than I'd expected. I'm not loving the yarn - too much acrylic. But it will be easy to take care of & one of the few yarns I could find that has 23 different colors to use. I'm a little worried it will be too many colors. I've never used so many before. Only time will tell.

Other posts relating to Babette:


Crafting With Style: How to turn your unused Babette Blanket Squares into a Scarf
Crafting With Style: Babette Blanket: Techniques to Make Your Squares More Uniform
Crafting With Style: Babette Blanket: 6 Techniques to Improve Your Work


original Babette Pattern from Intewave (click on the image to order the pattern)

Afghan & Blanket Sizes

November 2, 2014: When I published this list back in March of 2008 the world was a different place! Today there are much easier ways to create graphic content that is easily downloaded and I've gained a few years experience with Photoshop & Illustrator. As I scrolled through this page for the umpteenth time looking for a mattress size for a new project, I decided to spend some time creating an infographic that I could pin up in my workroom. 

That ended up being a much bigger project than I would have imagined! I ended up re-researching all the sizes and did find some changes in 6 years. So here's what I've come up with:
a list of popular U.S. afghan and blanket sizes for babies, kids and adults
Downloadable graphic of popular U.S. mattress, blanket, comforter and afghan sizes


If you'd like to save it to your computer or print it and pin it in your workspace you can download a printable pdf file here. And if you'd like to see what I've been up to in my new life as a surface and pattern designer check out my new blog.

Now that you've figured out what size to make your quilts you still need to figure out how much fabric to buy. Here are my favorite books to help with that process: 


And I also found this great system to hang quilts on a wall:
  

And here's my original post from March 6, 2008 (exactly 65,543 visits ago!):

In trying to figure out what size I ultimately wanted my Babette Blanket to be I did some research on standard mattress, sheet, blanket & comforter sizes. I know I've done this before but I can't find the papers so I'll put it here so I can find it again. Flat sheet measurements are from bedding industry standards. Everything else is sort of an average that seems about right. Crib blankets & receiving blankets seem to have the biggest variances - there's pretty much every size possible available. I listed the most prevalent.

Mattress depths vary widely be manufacturer. Measure the depth of the mattress before designing the blanket/quilt/comforter. Standard & older mattresses average 9 - 12", while newer pillow-top mattresses are 14 - 16" deep and up. These deeper mattresses obviously rquire more depth & width to cover the mattress completely. Be especially careful about making covers for very fluffy comforters such as down-filled. They tend to puff out the fabric, so there is much more area to cover than the dimensions listed on the package. Take several measurements of the comforter after it has been fluffed to decide how big to make the cover.


If you're making a blanket using squares, in addition to figuring out what size you want you'll need to calculate how many squares to make. I've written up notes on the process I use to figure out how many granny squares you need here.

TWIN: mattress top is 39" x 75"
Twin flat sheet: 66" x 96"
Twin Blanket: 66" x 90"
Twin Comforter: 69" x 90"

EXTRA LONG TWIN: mattress top is 39" x 80" ** Most popular size in college dorms
Extra Long Twin Flat Sheet: 66" x 102"
Extra Long Twin Blanket: 66" x 95"

FULL/DOUBLE: mattress top is 54" x 75"
Full/Double Flat Sheet: 81" x 96"
Blanket: 80" x 90"
Full Comforter: 84" x 90"

QUEEN: mattress top is 60" x 80"
Queen Flat Sheet: 90" x 102"
Blanket: 90" x 100"
Queen Comforter: 90" x 95"

KING: mattress top is 76" x 80"
King Flat Sheet: 108" x 102"
Blanket: 108" x 100"
King Comforter: 106" x 98"

CALIFORNIA KING: mattress top is 72" x 84"
California King Flat Sheet: 102" x 110"
Blanket: 104" x 108"

INFANTS & TODDLERS:
Receiving Blanket*: 
23" x 23", 24" x 24", 29" x 32", 30" x 36" or 36" x 36"
Stroller Blanket: 30" x 40"
Porta Crib (mattress top is 24" x 38") use receiving blanket
Small Cradle Blanket (mattress is 15" x 33") 15" x 30"
Large Cradle Blanket (mattress is 18" x 36") 18" x 33"
Crib Blanket(mattress top is 28" x 52"): 28" x 42" or 30" x 40" or 36" x 42" or 36" x 46"

AFGHAN SIZES

Infant - 2 years: 24" x 30"
2 - 6 years: 30" x 36"
7 - 11 years: 36" x 42"
12 years and over: 48" x 60"

Lapghan: 36"x 48" often used in nursing homes & wheelchairs
Adult: 50" x 70"

BED PILLOW SIZES
Standard 20" x 26"
Queen 20" x 30"
King 20" x 36"


* Receiving Blankets: I've seen lots of discussion on receiving blankets. Most people seem to think 23 or 24 inch squares are perfect for newborns, as there isn't too much fabric to manage. 29" x 32", 30" x 36" or 36" x 36" are the sizes most often made by manufacturers that are available in stores.

"Janem" also provided the following helpful info: Bev’s Country Cottage website gives suggestions for different size blankets.

This is basically what she recommends….
Blanket Sizes (approximate) For preemies, blankets without ‘holes’ are best.
Small Preemie: 18” - 20” square
Medium Preemie: 20” - 22” square
Large Preemie: 22” - 28” square
Full Term Baby: 28” - 36” square
Baby 30” x 36” = crib sized (6” granny squares= 5 across x 6 down ~ 30 sq)
Children 42”x 48” (6” squares= 7 across x 8 down ~ 30 sq)
Lapghan often used in seniors homes 36” x 48” (6” squares= 6 across x 8 down ~ 48 squares)
Adult Afghan (Will fit across top of bed) 48” x 72” = twin sized. (6” squares= 8 across x 12 down ~ 96 squares)
Adult Double Bed (Will fit across top of bed) 60” x 84” = full sized. (6” squares= 10 across x 14 down ~ 160 squares)


Please post a comment if you have suggestions or real-life experience with any of this!

Shantel R M brought up a great point in the comments below. If you're not happy with the size of a project when you've finished you can always add a border. I think the crochet book I turn to the most is:
I highly recommend it as a book you'll turn to time and time again.

Print Friendly and PDF

Wednesday

Babette Blanket: 6 Techniques to Improve Your Work

Babette Blanket (click on the image to order the pattern from Interweave)
 I'm a self taught crocheter. I used a book to learn, and I didn't read very much - just looked at the pictures. And I really only learned enough to do free form crochet - I've only done a couple of crochet projects using a pattern - so I haven't really tried to understand very much.

I'm assuming that's the reason I always have so many problems translating what the Babette Blanket pattern is trying to tell me what to do. There are always so many options on how to do a simple action. Like 2sc. Do I go into the front loop, the back loop, through the chain but not the bar below it, throught the chain & the bar? Each option gives a completely different look to the stitch. When you combine that with all the options for all the stitches in combination and then throw in needle size and tension it's taking me days to get my gauge swatches done. I also find myriad other little issues as I'm working that aren't addressed in the pattern. I'm guessing it's because I never learned "the standards". Or maybe it's just that I'm absurdly picky and have very strong opinions about what I like & I don't like. And then there's the whole problem of remembering what I've decided to do. Usually there are sticky notes on top of sticky notes stuck all over the pattern. Most of it is a matter of personal preference. But in the end consistency is important to me. (Although with so many squares I'm sure I can include all these different techniques into the blanket and no one will notice but me...)

So here's a list of my issues & actions I've decided. I've got to write it down or I'll never remember what I've decided & will be lost when the project gets pushed aside for a while as something new catches my eye....

1. Double Crochet: go through the chain or the chain & the bar?

Here are squares done each way:
The square on the left is just through the chain - not through the bar below the chain. the square on the right is through both the chain & the bar. Needless to say - the first thing that is very apparent is that blocking is crucial. I have no idea why the right square is so much more "tweaked" than the left square. Looking at the two squares side by side I couldn't see much of a difference so decided to block them up & call it a day.

After blocking it was easy to see that I prefer to dc under the chain but above the bar. I prefer the lacey-er look - and there's a bit of a bumpy ridge on the right square that I don't like the feel of. Plus, the rows seem more apparent and the whole structure is more pleasing to me.

2. Blocking - do I really have to?

As soon as I saw the squares this morning I knew the answer to that one. The blocked squares look so much better - and will be so much easier to assemble.

I've got my blocking down - I've got a couple "Quilter's Cut & Press" boards that I picked up at JoAnn's with a 1/2 off coupon. They're just big enough to be useful - but not so big as to be awkward. They stash behind my desk & fit perfectly on the kitchen counter. They've got a grid printed on them so I can pin to perfect squares. As the end of each day I grab the board, pin up the squares, hit them with a little steam from the iron and set them aside. Next morning I wake up to perfect squares. As far as I'm concerned a squares not finished until the last end is woven in & the square is blocked. I crochet the ends in as I go - so all I've got at the end is the last bit I tied off.) If I waited until the end to weave in the ends & block the squares I can say with certainty the thing would never get assembled....


3. What size hook?

The pattern calls for "E". Plymouth Encore DK yarn I'm using says "F" or "G". I used a 5 needle when I knit a baby blanket with the yarn and that looked good. My crochet tends to be pretty loose - so I started with an "E". I realized the squares have to be relative in size. Two 2-round squares have to equal one 4-round etc. The first few squares (2 round) looked good - pretty lacey after blocking. The 4 round square required a fair bit of stretching to get to size, but I thought I could make it work. The 8 round square was impossible to block out to the full size it needed to be. Pulled out the "F" hook. The 2 round squares are a bit bigger than ideal - but the 4's on up are great. I'll go a bit tighter on the 2 round squares & try to be looser on the bigger squares.


4. What's going on where the colors join together?


This is how it looks when I "join with a sl st in top of beg ch-3". The color from the row below goes into the color of the new row. Fixed this by joining the new color, then slipping the stitch in the top of the beg ch-3. Probably something they teach in Crochet 101...


5. What's going on with the holes where the round ends?


For some reason I'm getting a hole where each round ends. I solved this by doing Ch 2 instead of Ch 3 at the beginning of the round. No idea why it works, but it does...


6. What's going on with the corners?

There's an extra little loop showing up in my corners. After looking at it I realize it's because my dc is going under the chain, but over the bar. That's the bar showing through. Solution: in the corner I do 2dc, ch2, 3dc.


Now my corner is clean!


So here's my version of the instructions combining all my changes:

Using "F" hook:

Round 1:
Work over tails as you go!
Ch 4.
(dc, [ch2, 3dc] 3x, ch2, dc) all in 4th ch from hook.
Join with sl st in 3rd ch (hook below the chain, but above the bar) of beg ch4. (For color change: attach new color, then sl st in 3rd ch (go below the chain but above the bar)of beg ch4) Do not turn. (Run the tail up one of the crochet stems to the chain level so you can crochet over it on the next round.)
Check work: each side should have 3 stems. Each corner should have 2 chains.

Round 2:
Ch2. dc in next dc (hook below the chain, but above the bar)
in corner space: 2dc, 2ch, 3dc.
1dc in each of next 2 dc spaces (hook below the chain, but above the bar).
Continue until the beginning. Finish as in round 1.
Check work: each side should have 7 stems. Each corner should have 2 chains.

Continue on in this pattern.

Hopefully this will jog my memory when I've been away from the project for awhile!

Now that you've perfected your squares, have you grown bored with the project before you've made enough for a blanket? When that happened to me I turned them into a scarf. Instructions and a graph for layout are here.

Babette Squares sewn up as a scarf


Tuesday

Babette Blanket: Techniques to Make Your Squares More Uniform

Beginning with scraps from the Garter Stitch Blanket I'm starting the Babette Blanket from the Interweave Crochet Spring 2006 issue. I'm using Plymouth Encore DK and an E crochet hook.

The first few squares caused me to figure out a few tweaks to the pattern that seemed to work better for me. On the color changes I tied on the new color before doing the final slip stitch to join the round. The blue & yellow square on the right shows how it looks - no weird jog. The square on the far left shows what I mean where the purple meets the blue on the top in the middle.

I also think it looks cleaner on the corners to do 2dc, ch2, 3dc in the ch2 space - then dc in each of the dc to the next 2ch space. Again - just looks a bit cleaner (blue & yellow) than the way the pattern is written. Or at least the way I interpret the way the pattern is written. I'm a completely self-taught crocheter & I'm not sure I really understand how to read a pattern. I'm much better at looking at the finished piece & then figuring out how to make my piece look like I want it to.

Here's what the original pattern looks like. Click on the image below to order the pattern online.


Monday

Garter Stripe Baby Blanket


Garter Stripe Baby Blanket

Plymouth Encore DK: 1 skein each of 13 colors*
Size 5 circular needle.

I used the "Kiss My Shadow" online stripe generator to come up with the pattern, limited to 1, 2 or 3 row stripe widths. It's a fun toy to play around with - I did it quite a few times until I found a version I liked.

From there its was easy:

Cast on 140.

Knit in garter stitch following stripe pattern to desired length. Mine ended up being 30" wide by 36" long. (See my notes and a list of average blanket sizes if you want to make a blanket or afghan for a child or adult.)

I'm not a big fan of acrylic, but I know moms like it because it's machine washable, and I was looking for something that came in a lot of colors and was relatively inexpensive. The Encore, at 75% acrylic & 25% wool wasn't quite as soft & cuddly as pure wool would be - but it was considerable cheaper and should be easy to care for. The color selection is fantastic. I chose strong bright colors - but it also comes in baby pastels.

The benefit of the garter stitch stripe is that the blanket is interesting from both sides.


*13 colors I used: 4379 (Celery). 1304 (Seafoam) . 999 (Burgundy). 848 (Navy). 9601 (Red). 1382 (Yellow).217 (Black). 515 (Wedgewood Blue). 233 (Lavender). 1384 (Purple). 1385 (Hot Pink). 1383 (Orange). 1317 (Teal)