| Size | Height x Width (mm) | Height x Width (in) |
| 4A0 | 2378 x 1682 mm | 93.6 x 66.2 in |
| 2A0 | 1682 x 1189 mm | 66.2 x 46.8 in |
| A0 | 1189 x 841 mm | 46.8 x 33.1 in |
| A1 | 841 x 594 mm | 33.1 x 23.4 in |
| A2 | 594 x 420 mm | 23.4 x 16.5 in |
| A3 | 420 x 297 mm | 16.5 x 11.7 in |
| A4 | 297 x 210 mm | 11.7 x 8.3 in |
| A5 | 210 x 148 mm | 8.3 x 5.8 in |
| A6 | 148 x 105 mm | 5.8 x 4.1 in |
| A7 | 105 x 74 mm | 4.1 x. 2.9 in |
| A8 | 74 x 52 mm | 2.9 x 2.0 in |
| A9 | 52 x 37 mm | 2.0 x 1.5 in |
| A10 | 37 x 26 mm | 1.5 x 1.0 in |
Sunday
List of Paper Sizes (in inches and millimeters)
Wednesday
My Favorite Free Hat Patterns to Knit or Crochet
A list, with photos, of my favorite free patterns to knit or crochet hats.There are so many lists of free knit and crochet patterns out there, but they usually don't have photos. So here's a quick list of what I think are the best free patterns out there. Leave me a message below with a link to your favorite if you'd like to add it here.
 |
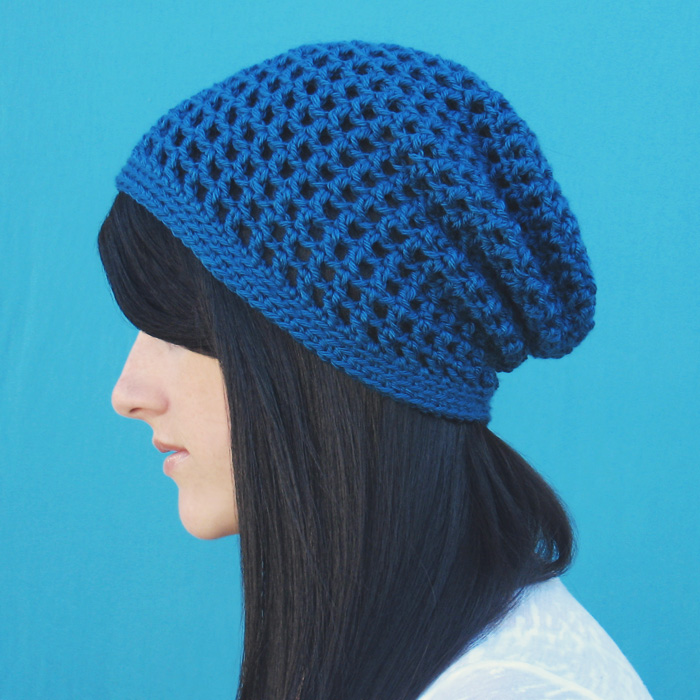
Easy Slouchy Hat
|
This is the hat I've knit the most. It can be finished in an afternoon and using variegated yarns make it look much more complicated than it actually is. The pattern is available as a free Ravelry download. It's shown here in Twisted Sister Jazz yarn . I used two colors (60 & 69) and alternated with two rows of each color throughout the hat. I've also seen it knit up in Blue Sky Alpaca Organic Cotton (if you're on Ravelry you can see a photo here), Malabrigo Rios (Ravelry photo here), Debbie Bliss Andes Alpaca Silk
 (Ravelry photo here).
 |
La Parisenne
|
I love the zigazaggy stripes of this one. the pattern calls for a yarn called SockPixie Sock yarn. The free knitting pattern for this beret can be downloaded here.It appears to be knit with an artisan dyed yarn that isn't available currently. I of course will go to one of my favorite yarns for striping, Noro Kureyon Sock Yarn or Noro Silk Garden Sock Green/Aqua/Brown .
.
 |
Undergrowth Hat on Knitty
|
I love Knitty. But I even find it frustrating. Entering a search for "hat" brings up a list with no pictures. And of all the hats on the site, Undergrowth is the one I want to remember. (Download for Undergrowth Free Knit Hat Pattern is here.) It calls for 1 skein in each of two colors of Brown Sheep Nature Spun Sport (colors pictured are #103 Deep Sea & #N003 Grey Heather.)
 |
Tortora Hat on Knitty
|
Bobbles are one of my favorite stitches. Another Knitty option (free download for the knitting pattern is here), this knit hat mixes bobbles and stripes in an interesting way. It calls for 1 skein of Lana Grossa Alta Moda Alpaca Yarn and has versions for both a typical beanie and a slouchy toque.
 |
Hatticus by Susanna Celso
|
A great cable pattern knit out of a bulky yarn, the Hatticus knit hat by Susanna Celso is available as a free download on Ravelry with notes on her blog. It's shown here in Cascade Magnum , requiring about 80 yards according to her notes.
 |
| Lollipop Hat by Brittany Tyler |
This is a fun hat that looks like it will be fun to knit. The instructions, available to download from the Tangled webzine, say it can be knit in up to 8 different colored stripes, making it a good project for using up leftover bits.
Free Pattern: Sugar Cone Skully Hat. Uses worsted weight yarn. Looks as though it will be quick and easy to make.

Norwich is a slouchy stockinette cap worked in the round, with a simple rolled brim using 2 balls of Berroco Floret.
Saturday
Favorite Free Knit and Crochet Patterns for Bags
There are so many free patterns to available that I find it a bit
overwhelming to choose, or to keep track of the ones I might want to
make someday. There are sites that list free patterns, but they only
list the name, not a photo of the piece. Even Ravelry can get
overwhelming. So I'm going to start linking to favorites of mine, with
pictures. Hopefully someday I'll be able to include my own photo of each
of the items....
 "Sunburst Granny Bag" by Rajeswari on her blog diapermum is a fresh colorful take on a summer bag. It's got a very thorough tutorial and a link to instructions on making the sunburst square.
Made out of Lily Sugar'n Cream this brightly colored
crocheted beach bag (the body measures 15" x 17") requires just 15
motifs.And at just under $2.50 a ball, the whole bag is only $20. Seems
like a perfect summer project! Get the free pattern in .pdf format here from the Lily website.
Materials needed:
Lily® Sugar’n Cream® (70.9 g/2.5 oz; 109 m/120 yds)
Contrast A
Red (00095) 60 m/66 yds or 1 ball
Contrast B
Hot Orange (01628) 65 m/71 yds or 1 ball
Contrast C
Yellow (00010) 90 m/100 yds or 1 ball
Contrast D
Hot Green (01712) 95 m/105 yds or 1 ball
Contrast E
Light Blue(00026) 200 m/220 yds or 2 balls
Contrast F
Mod Blue (01111) 215 m/236 yds or 2 balls
Size 4 mm (U.S. G or 6) crochet hook or size needed to obtain gauge. Optional: Fabric for lining approx 18” x 36” [45.5 x 91.5 cm].
This knit bag with a large cable stitch repeat
reminds me of the Margaret Nicole Bags that I've seen in Vogue &
Elle and that are $150 to $200! This one is 18" x 10". You could easily
substitute either the straight or round handles that Margaret Nicole
uses and add a big satin ribbon. And with only 4 balls of yarn needed,
it will only be about $10 for the yarn plus a few dollars for the
handles. Download a .pdf of the pattern here from the Lily website.
Materials needed:
Lily® Sugar’n Cream® (70.9 g/2.5 oz; 109 m/120 yds)
Ecru (00004) 345 m/375 yds or 4 balls
Size 4.5 mm (U.S. 7) knitting needles or size
needed to obtain gauge. Cable needle.
2 leather purse handles 24” [61 cm] longas shown in the picture. Or substitute Round Bamboo Handles
Another great crocheted bag. It's the same square that's used in the Babette Blanket. Which gives you something to do with the squares you've already made but have come to realize you'll never get enough done for the whole blanket.....
Download the pdf for the bag here.
The bag is shown here in a cotton yarn from the UK called Anchor Magicline. It's essentially the same as Lily® Sugar’n Cream, which also comes in a variegated blue that would look very much like the Magicline.
I can't think of anything I've seen in Noro that I
don't love, but this striped knit bag is pretty terrific. Striped
knitting is so much fun with Noro yarns. I always work through it very
quickly because I'm so excited to see what happens next with the yarn.
And the shape and size of this bag are just what I like, big, but not
huge. Designer Deborah Cooke talks about it in a blog post, and the pattern is available to download on Ravelry.
It calls for 3 skeins of Noro Kureyon and 3 skeins of Patons Classic Wool Yarn
 .
.
Seattle Yarn features another Noro Yarn, Tidiori, in
this quick to make knit entrelac clutch. The relatively small size, 8" x
5" make this bag a great way to ease into learnign to knit entrelac.
Tidiori was discontinued in Spring 2007, but Noro Silk Garden would make an excellent substitute. the pattern is available as a free pdf download on their website.
 , Shoot # 814
 , Sky #749
 and Persimmon #832
  . (The pattern calls for Pier Blue which has been discontinued, but Sky is a very close shade.) You'll need 1 ball of each.
A cheerful summery bag to crochet is available on the Drops Design site. The Sicily bag calls for size 3.5 mm/E/4 (or size needed) to get 17 dc = width 10 cm / 4''. 1 square = approx. 10 x 10 cm / 4'' x 4''.

"Sunburst Granny Bag" by Rajeswari on her blog diapermum is a fresh colorful take on a summer bag. It's got a very thorough tutorial and a link to instructions on making the sunburst square. |
| Hexagon Beach Bag in Sugar'n Cream |
Materials needed:
Lily® Sugar’n Cream® (70.9 g/2.5 oz; 109 m/120 yds)
Contrast A
Red (00095)
Contrast B
Hot Orange (01628)
Contrast C
Yellow (00010)
Contrast D
Hot Green (01712)
Contrast E
Light Blue(00026)
Contrast F
Mod Blue (01111)
Size 4 mm (U.S. G or 6) crochet hook or size needed to obtain gauge. Optional: Fabric for lining approx 18” x 36” [45.5 x 91.5 cm].
 |
| "Staghorn" Cabled Purse in Sugar'n Cream |
Materials needed:
Lily® Sugar’n Cream® (70.9 g/2.5 oz; 109 m/120 yds)
Ecru (00004)
Size 4.5 mm (U.S. 7) knitting needles or size
needed to obtain gauge. Cable needle.
2 leather purse handles 24”
 |
| Inga's Bag |
Another great crocheted bag. It's the same square that's used in the Babette Blanket. Which gives you something to do with the squares you've already made but have come to realize you'll never get enough done for the whole blanket.....
Download the pdf for the bag here.
The bag is shown here in a cotton yarn from the UK called Anchor Magicline. It's essentially the same as Lily® Sugar’n Cream, which also comes in a variegated blue
 |
| Stripey Noro Messenger Bag |
It calls for 3 skeins of Noro Kureyon
 |
| The Simply Lovely Clutch |
I'm intrigued by both the unusual shapes of this
crocheted bag. A free download on the Interweave
site, the bag is crocheted with 4 different colors of Rowan Cotton Glace: Heather #828 
A cheerful summery bag to crochet is available on the Drops Design site. The Sicily bag calls for size 3.5 mm/E/4 (or size needed) to get 17 dc = width 10 cm / 4''. 1 square = approx. 10 x 10 cm / 4'' x 4''.
Monday
How to Make Your Own Gesso
I've become quite enamored with Gesso lately. I started using it on my Art Journal pages and discovered that it gives a much better surface for mixed media and keeps the paint from bleeding through the back side of the page. I like the Liquitex brand best, but it gets a bit expensive since I like to slather it on with a credit card pretty thickly.The best price I've found is on Amazon:
Meanwhile, I'm going to research and experiment with making my own gesso to try to save some money.
Historically, gesso was made by mixing calcium carbonate, gypsum, and/or chalk with glue. When applied to wood, it hardens to a bright white and can be used as both a primer and a material for sculpting (like the raising, decorative work on frames). In Renaissance times gesso was used as a ground for tempera paint. On furniture and decorative moldings it can be built up and carved into. Historically, gold leaf was applied to wood that had been coated with a layer of gesso.
Modern gesso follows the same principles, but adds acrylic polymer and chemicals to maintain flexibility.
Calcium Carbonate is a chemical compound (formula CaCO3) that is commonly found in rocks all over the world. It is the main component of seashells, snail shells, pearls and eggshells. It's the active ingredient in agricultural lime & is the primary cause of hard water (it's the hard white stuff that builds up on your bath fixtures). It's also what used in calcium supplements & as an antacid, but taking too much can be hazardous. Easier than grinding up rocks and shells, Plaster of Paris (the result of calcination of gypsum) can be used. Chalk can also be used, but the "real" kind, not the synthetic stuff you buy at a school supply store.
I've found that whatever gesso I use, it's really hard on brushes. I use a really cheap brush that I only use for gesso application, and don't expect it to last very long.
MAKING YOUR OWN GESSO:
There is lots of research on historical methods of making gesso. The product we buy today is a modern version of the original.
METHOD #1: (Plaster of Paris and Glue)
1. Slake your plaster of Paris by mixing together 1 part plaster of Paris and 4 parts water. Let the mixture sit until the plaster settles to the bottom. Then pour off the water and mix again. Repeat this process three times. The plaster reacts with the water. If the mixture gets warmer than when you started, repeat the process. If it appears to be the same temperature as when you started, then your plaster is slaked.
2. Scoop out the plaster of Paris and let it dry completely. Break up any clumps that appear (they may have pockets of moisture). Use a standard kitchen cheese grater and grind it into a fine powder.
3. Mix three parts of the slaked plaster of Paris to 1 part white glue. Add several drops of honey to every tablespoon or so of this mixture. Mix thoroughly and pound out any lumps. Your mixture should have the consistency of pancake batter. The gesso is now ready to use.
4. If you want to color your gesso, mix in a coloring agent. Watercolors, gouache oR acrylics all work well, are fairly inexpensive and easily acquired.
Store your gesso in an airtight container. Add a little water if the gesso becomes too dry. When applying gesso never put your brush directly into the storage container. Always pour out what you need and discard what you don't use. Gesso is easily contaminated and the whole jar can easily become a stinky, rotten mess.
Plaster of Paris is available at most art/craft shops or by mail from Amazon.
METHOD #2 (Dextrin Powder, Plaster and Glue)
1. Mix together 1 cup of dextrin powder (you can order Dextrin / Fine Yellow Powder / 2 Ounces / 100% Pure / Food Grade / SHIPS FAST FROM USA online) and 1 tbsp. of hot (minimum 110 degrees F) water in a mixing bowl. (Yellow dextrin is a glue product, not to be confused with white dextrin which is a food additive that's used as a binder to hold things together. Then there's malto-dextrin which is yet another food additive. But it's yellow dextrin that you want for gesso.)
2. Add 1 tsp. of the dextrin solution and 1 tsp. of standard white craft glue in a separate mixing bowl and stir. Add 1 tbsp. of patching plaster and mix well. This makes a fairly thick paste, suitable for making raised decorative shapes on frames etc. The paste should be pretty stiff but still viscous enough to pass through a 1/4-inch pastry tip. Scoop the gesso paste in a pastry bag fitted with a 1/4-inch diameter pastry tip. Apply the paste as needed and allow 2 hours for it to dry.
3. To use the gesso for priming canvas or paper for painting or mixed media work, add 1/4 cup of hot water and mix well.
Store your gesso in an airtight container. Add a little water if the gesso becomes too dry. When applying gesso never put your brush directly into the storage container. Always pour out what you need and discard what you don't use. Gesso is easily contaminated and the whole jar can easily become a stinky, rotten mess.
METHOD # 3 Chalk & Glue
Follow Method # 1 instructions substituting chalk for the grated plaster. I'm lucky to have a rock-climber in the family, so I can dig into his Black Diamond Loose Chalk 300g BD5504950000ALL1 bag. It's pretty cheap, and easier to use than making plaster, drying it & grating it. Calcium Carbonate - 1 lb.
 is technically what was used historically. It's a little more than $6 a pound.
METHOD #4 A Modern Adaptation of Cennino Cennini's Recipe
Tom Irizarry has written an interesting article on adapting ancient recipes to modern times can be found here. It also has a good bibliography for further study.
I'll continue to update with resources. Please add comments with your own research and relevant links.
2. Add 1 tsp. of the dextrin solution and 1 tsp. of standard white craft glue in a separate mixing bowl and stir. Add 1 tbsp. of patching plaster and mix well. This makes a fairly thick paste, suitable for making raised decorative shapes on frames etc. The paste should be pretty stiff but still viscous enough to pass through a 1/4-inch pastry tip. Scoop the gesso paste in a pastry bag fitted with a 1/4-inch diameter pastry tip. Apply the paste as needed and allow 2 hours for it to dry.
3. To use the gesso for priming canvas or paper for painting or mixed media work, add 1/4 cup of hot water and mix well.
Store your gesso in an airtight container. Add a little water if the gesso becomes too dry. When applying gesso never put your brush directly into the storage container. Always pour out what you need and discard what you don't use. Gesso is easily contaminated and the whole jar can easily become a stinky, rotten mess.
METHOD # 3 Chalk & Glue
Follow Method # 1 instructions substituting chalk for the grated plaster. I'm lucky to have a rock-climber in the family, so I can dig into his Black Diamond Loose Chalk 300g BD5504950000ALL1
METHOD #4 A Modern Adaptation of Cennino Cennini's Recipe
Tom Irizarry has written an interesting article on adapting ancient recipes to modern times can be found here. It also has a good bibliography for further study.
I'll continue to update with resources. Please add comments with your own research and relevant links.
Subscribe to:
Posts (Atom)